DIY Turkish Hammam at Home brings the warmth, steam, and mindful cleansing of a traditional Turkish bathing ritual into your own bathroom, letting you schedule sessions on your terms and budget. To recreate the experience safely, start with practical at-home hammam tools that support a steady, controlled environment rather than a full spa setup. Learning hammam steam room techniques helps you pace heat, humidity, and breathing so the body relaxes without overheating. As you proceed, you’ll uncover traditional hammam bath benefits such as smoother skin, improved circulation, and a sense of ritual that you can replicate with simple, safe at-home spa practices. This guide emphasizes patience, hydration, and skin-friendly products, ensuring the experience remains enjoyable and safe while you enjoy a personal spa moment.
Looking beyond the Turkish bath label, you can think of this as a steam-enhanced home ritual that blends cleansing, warmth, and mindful downtime. Alternative terms, such as an Ottoman-inspired bath routine, a wellness steam session, or a home spa cleansing practice, echo the same idea in accessible language that aligns with modern search patterns. In practice, you’re creating a moisture-rich environment, a measured exfoliation sequence, and a relaxing cooldown that fits your bathroom and schedule. Placing emphasis on semantically related concepts helps readers and search engines connect this routine to safe, skin-friendly self-care at home.
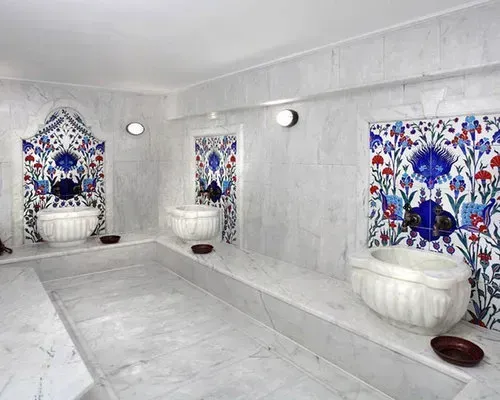
1. DIY Turkish Hammam at Home: Tools, Setup, and Safety
A genuine DIY Turkish Hammam at Home starts with careful tool selection and a calm, inviting space. Gather the core items that approximate the hammam experience without a full spa setup: a heat-and-steam source, a sturdy non-slip bench, a kese exfoliating mitt, and a mild or traditional olive-oil soap. When you speak of at-home hammam tools, you’re choosing items that balance effectiveness with safety, so you can enjoy steady warmth and controlled humidity in your own bathroom. This approach aligns with the idea of turkish hammam at home by translating ancient ritual into accessible, modern practice.
Safety comes first in any home spa routine. Ensure the bathroom is well-ventilated and the floor remains dry when moving between steps. Patch-test new soaps or oils on a small skin area, and avoid fragrances if you have sensitive skin. These precautions reflect safe at-home spa practices and help you maintain comfort as you begin to explore hammam steam room techniques in a familiar setting.
2. Hammam Steam Room Techniques for a Rejuvenating At-Home Experience
The core of a hammam-inspired session is the proper use of steam and warmth to soften skin and relax muscles. If you have a humidifier or a steam shower, set it to a gentle, even humidity to create a comfortable hammam atmosphere. During this stage, your focus is steady breathing, slow movements, and letting the steam work through the upper body and limbs, which mirrors hammock-like relaxation while staying within safe limits for the home.
As you explore hammam steam room techniques, remember to monitor hydration and temperature. Sit or lie on the bench long enough to allow the heat to penetrate, but avoid overheating by taking short, mindful breaks. This phase blends Turkish ritual with at-home practicality, helping you feel pampered while reinforcing the idea that traditional hammam bath benefits can be enjoyed without leaving the house.
3. Exfoliation and Cleansing Rituals: Kese and Mitts at Home
Exfoliation is the heart of the cleansing phase in any hammam-inspired routine. After the skin has softened in the steam, switch to exfoliation with a kese mitt or a soft alternative like a konjac sponge. Use long, gentle strokes from the center of the body outward, focusing on elbows, knees, and heels. The concept of at-home hammam tools emphasizes safety and effectiveness, ensuring you remove dull skin without irritating delicate areas.
Cleansing continues with a warm rinse to wash away loosened skin cells and soap residue. Pat the skin dry and move into hydration, applying a light layer of moisturizer or natural oil to lock in moisture. This cleansing ritual reflects the traditional hammam bath benefits by promoting smoother skin and a calmer, more mindful post-steam routine.
4. Hydration, Skin Care, and Post-Ritual Care in a DIY Hammam Session
Post-session care centers on restoring moisture and protecting the skin after heat and exfoliation. Use a gentle moisturizer or natural oils such as jojoba or almond oil to seal in hydration. For those who enjoy a touch of aroma, apply mild essential oils sparingly and patch-test first to prevent irritation. This step reinforces safe at-home spa practices by prioritizing skin compatibility and comfort after steam exposure.
Hydration isn’t just topical; keep a glass of water nearby and sip regularly to maintain internal hydration. Between sessions, consider a light, breathable robe and a warm, calm environment to extend the sense of pampering. Attending to post-ritual care helps translate the traditional hammam bath benefits into a sustainable, home-based routine.
5. Long-Term Benefits and Creating a Consistent DIY Routine
Regularly practicing a DIY Turkish Hammam at Home can contribute to improved skin texture, better circulation, and a deeper sense of relaxation. By weaving warm steam, gentle cleansing, mindful exfoliation, and hydration into a weekly or biweekly routine, you can experience many benefits associated with traditional hammam baths without the need to visit a spa. This consistency turns a simple bath into a moment of focused self-care that respects both tradition and modern life.
To maintain momentum, adapt the routine to your space and skin responses. Start with shorter sessions and gradually extend them as you become more comfortable with the rhythm. The overarching goal is safe, enjoyable self-care that echoes the traditional hammam bath benefits while staying practical for everyday life in your own home.
Frequently Asked Questions
What is a DIY Turkish Hammam at Home, and how can I recreate the experience safely?
A DIY Turkish Hammam at Home is a ritual of warmth, steam, and mindful cleansing you can perform in your bathroom on your schedule and budget. Essential setup includes a heat/steam source (humidifier, steam shower, or a warm, humid bathroom), a low bench or stool, a kese or soft exfoliating mitt, a mild or olive-oil soap, towels, and a basin. The core steps are warm-up, gentle cleansing, steam exposure, exfoliation, rinsing, and hydration, ending with a calm, refreshing finish. For safety, ensure good ventilation, start with 5–10 minutes of steam, avoid leaving hot devices unattended, and patch-test any new products before use.
What are the essential at-home hammam tools for a DIY Turkish Hammam at Home, and how do they support safe at-home spa practices?
Key at-home hammam tools include a heat/steam source, a bench, a kese mitt or soft exfoliating mitt, a mild soap (or traditional olive-oil soap), towels, a basin, and a non-slip mat. These items help recreate the hammam experience while supporting safe at-home spa practices by enabling stable seating, controlled humidity, and gentle cleansing and rinsing. Use caution with aromatics: keep concentrations low and patch-test if you have sensitive skin. Also ensure the bathroom floor is dry, ventilate well, and clean tools between sessions.
What hammam steam room techniques can I use in a DIY Turkish Hammam at Home to soften skin without irritation?
Begin with a gentle warm-up to raise humidity without overheating. Sit or lie on the bench, breathe slowly, and let the steam soften the skin before exfoliation. After the skin is pliable, use a kese mitt with light, long strokes to exfoliate, avoiding sensitive areas. Rinse thoroughly, pat dry, and hydrate with a moisturizer or natural oil.
What traditional hammam bath benefits can I expect from a DIY Turkish Hammam at Home, and how should I translate them?
Benefits include smoother skin texture from controlled exfoliation, relaxed muscles and improved circulation from warm steam, and a mindful self-care ritual that supports mood and stress relief. Translate these by maintaining a consistent routine, staying hydrated, and using gentle products suited to your skin. Start with shorter sessions (15–20 minutes) and adjust as you become comfortable, finishing with hydration and cooling.
How can I ensure safe at-home spa practices when performing a DIY Turkish Hammam at Home if I have sensitive skin?
Follow safe at-home spa practices: patch-test every new soap or oil on a small patch of skin; choose fragrance-free or mild products and avoid essential oils if sensitivity is present. Keep steam moderate and sessions brief, and stop if you notice burning or irritation. Ensure good ventilation, stay hydrated, and consult a clinician if you have skin conditions, pregnancy, or cardiovascular concerns before starting steam-based routines.
| Topic | Key Points |
|---|---|
| Introduction | – A Turkish hammam is a ritual of warmth, steam, and mindful cleansing. – DIY at Home lets you recreate that tranquil spa experience in your own bathroom, on your schedule and budget. – The guide covers essential tools, authentic yet practical techniques, and safe practices. |
| Tools, Setup, and Preparation | – Heat-and-steam source: humidifier or steam shower, or a hot, steamy bathroom for 5–15 minutes; avoid leaving a kettle unattended. – Benches or a sturdy, non-slip stool. – Kese exfoliating mitt (or a soft exfoliating mitt or konjac sponge). – Olive-oil soap or mild, unscented soap (sabun is traditional but a mild cleanser works too). – Towels and a bathrobe; basin, water, and ambient towels for rinsing. – Optional aromatics with caution: mild essential oils if tolerated; avoid strong fragrances for sensitive skin. – Non-slip mat or folded towel for a safe surface warm-up. |
| Step-by-Step Technique (Overview) | – Step 1: Warm-up and space preparation (acclimate to warmth for a few minutes). – Step 2: Gentle cleansing to open pores with a mild soap or olive-oil soap. – Step 3: Create the hammam steam and relax; sit/lie back and stay hydrated. – Step 4: Exfoliation with the kese mitt using gentle, long strokes on non-irritated skin. – Step 5: Rinse thoroughly and pat dry. – Step 6: Hydration and care with a light moisturizer or natural oil; patch-test essential oils. – Step 7: Optional rejuvenation cycle: repeat steam and exfoliation if desired, then hydrate and cool. |
| Maintaining the Ritual | – Build a mindful routine that suits your space and skin; aim for a balanced approach rather than exact spa conditions. – Start with 15–20 minutes total, then gradually extend as you become comfortable. – Preserve the core sequence: warmth & steam, cleansing, exfoliation, rinsing, hydration. – Adapt tools and steps to personal preferences while keeping the ritual’s spirit. |
| Safety, Hygiene, and Best Practices | – Temperature and time: avoid overly hot steam; begin with 5–10 minutes. – Skin sensitivity: patch-test new soaps/oils on a small patch. – Skin integrity: don’t exfoliate over broken or irritated skin; discontinue if burning or stinging. – Hydration and nutrition: keep water nearby and sip during the session. – Ventilation: maintain airflow to prevent overheating and condensation. – Product choices: use mild, fragrance-free products for sensitive skin. – Pregnancy and medical conditions: consult a clinician before steam exposure if applicable. |
| Traditional Hammam Benefits at Home | – Cleansing, relaxation, and a sense of ritual; adaptable to home settings. – Improved skin texture through controlled exfoliation with proper hydration. – Promotes circulation and relaxation from warm steam and mindful breathing. – Supports a personal self-care ritual and consistent pampering time. |
Summary
DIY Turkish Hammam at Home offers a gateway to traditional spa-style cleansing, exfoliation, and relaxation right in your own bathroom. By selecting the right at-home hammam tools, following a simple step-by-step routine, and observing safety practices, you can enjoy a soothing, skin-brightening regimen that respects both tradition and modern comfort. Start with shorter sessions of 15 to 20 minutes and adjust the routine to your space and skin needs, turning your DIY hammam into a cherished weekly ritual that adds a touch of Turkish bath serenity to everyday life.

